WebGL is a graphics library for web browsers, based on a version of OpenGL for embedded devices, OpenGL ES. The library allows for customized real-time 3d graphics rendering in modern browsers, including the use of shaders. There is a variety of scenarios in which you would want to make use of such a library. Consider, for example, browser games, 3D maps and product views. The simple WebGL interface is accessible via JavaScript and even whole frameworks are available, such as three.js (for an introduction, see Johannes Brosi’s great article from earlier this month).
As Christmas holidays are approaching, it is nice to have some toys to play around with. In this tutorial, I will provide a basis for fiddling around and experimenting with WebGL and fragment shaders, since it turned out to be a lot of fun to play around with them, and the basic concept is relatively easy to grasp. This article basically follows my own way of coming to play around with fragment shaders in WebGL. The idea was generated shortly before the Mayflower/Liip Barcamp, where David Sora Parra and I organized a collaborative session in which we wanted to generate some coding fun by discovering the unknown together.
As I mentioned above, WebGL is accessed via JavaScript. For my experiments, I use the latest version of Google Chrome and a simple text editor. The frame of our toy will be minimalistic HTML5 containing one canvas element, since WebGL uses canvas elements for drawing:
The result is a blank screen. WebGL is then initialized by retrieving a WebGL object on the basis of the canvas, which can then be used for further WebGL operations. Here is an extension of our JavaScript that initializes WebGL and clears the WebGL canvas with a red color:
Keine Sorge – Hilfe ist nah! Melde Dich unverbindlich bei uns und wir schauen uns gemeinsam an, ob und wie wir Dich unterstützen können.
}
// ]]>
Things are straightforward. We declare two global variables, the GL object and the canvas object, since we need them in both the function which does the basic initialization (init) and in the render function which continuously does all the drawing (render). Next, we set the window onload event to init.
The initialization function retrieves the HTML canvas object and initializes a WebGL object on its basis. We set the width and the height of the canvas and then initialize the so-called viewport of the WebGL object. After that, a first call to render is made, to actually draw something.
The render function first requests a next animation frame to guarantee continuous rendering. After that, a clear color is set to red with full opacity (the color format is RGBA) and gl.clear is called. The call of gl.clear comes with a constant that indicates that the color of the screen buffer should be affected.
So far this is not too exciting. To get something more useful, and something to play around with, we need the concept of a shader. Shaders are small programs normally executed on the GPU, massively parallel. The two types of shaders relevant here are the so-called fragment shader and the vertex shader. In the case of WebGL, they are written in a derivative of the OpenGL Shading Language (GLSL).
3d graphic processing historically works like that: a 3d model is loaded, which is basically a set of points (vertices) in 3 dimensional space plus a descriptions how these points form polygons. This model, and especially the set of vertices, is then transformed from a local, natural description (which is called object space) to a description that can then directly be used to draw the polygons (the screen space). The several transformations do not matter much here, but it is worth mentioning that scalings, rotations and perspective corrections are all done during the phase of transforming a mesh from object space to screen space. Most of these calculations can be done vertex by vertex --- by a vertex shader. However, here we will only use a trivial vertex shader which does not do any transformations, so you can ignore most of the information in this paragraph.
With this normalized information, the render engine can then use relatively simple polygon drawing algorithms to draw polygons pixel by pixel. This is where the fragment shader comes into play. Think of fragments as pixels that are covered by a polygon. For every fragment, a fragment shader is called which has at least the coordinates of the fragment as an input and delivers the color to be rendered as an output.
Normally, fragment shaders are used for lighting and post-processing. However, idea for easy experimenting is as follows: we draw two polygons (triangles) which cover the whole visible screen, and only the visible screen. We can then use a fragment shader to determine the color of each pixel on the screen. We can thus conceive of the fragment shader as a function from screen coordinates to colors, and then experiment with such functions. And this turns out to be a very fun toy to have. In fact, what you can draw this way this way is only limited by your curiosity (and, of course, your hardware and some general limits of the shader language). As an example, consider that whole raytracing engines are designed with fragment shaders. We will, however, start with something more simple. Let's begin with a bit of code containing the frame for our experiments:
First we need to draw a primitive on the cleared screen, a quad consisting of two triangles, filling the whole screen and serving as a canvas for our fragment shader, as described above. For this reason, we introduce a new global variable containing its description:
The values are what we want since, by default, -1 and 1 will be mapped to the limits of our screen. The primitive is then drawn in the render function, like this:
gl.drawArrays(gl.TRIANGLES, 0, 6);
If you execute this code, you won't see anything more. This is because WebGL still does not know how to draw the quad. This is where our two shaders enter the picture. As I mentioned above, we need both a vertex shader and a fragment shader. We introduce them as new script elements above our JavaScript. Our very simple default vertex shader looks like this:
It tells WebGL that exactly the same position should be used for final rendering than the position given in the vertex description. In other words, we directly use the vertex data input as output. The pixel shader is a little bit more interesting. First, the script:
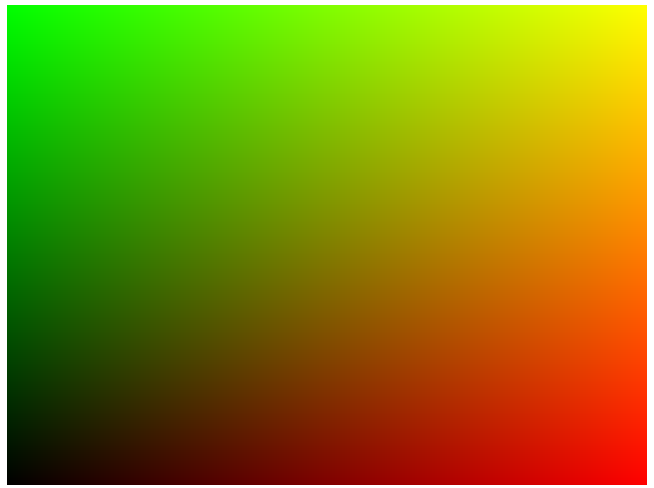
What we have here is a function that yields the final color of a fragment or pixel on our drawn canvas. This is done by setting the gl_FragColor variable. gl_FragCoord.x and gl_FragCoord.y are the x and y positions on our canvas in screen space, that is they will range from 0 to 640 and from 0 to 480 because this is the size of the canvas on the screen. For every combination of these values, the pixel shader is called and a color is calculated. In this case, we set the red component dependent on the x position and the green component dependent on the y position. The color components of gl_FragCoord.y range from 0.0 to 1.0, so we need to divide the position by the size of the screen to get all values between 0 and 1.
All we need to do now is to tell WebGL that these shaders should be used to render our primitive. This is done as follows. First, we need to load the shaders in our init function. We first declare four local variables:
  var shaderScript;
  var shaderSource;
  var vertexShader;
  var fragmentShader;
And then insert the following code directly before the call to render():
This code is actually pretty simple. We load the content of the script elements, create a shader of the right type with a call to gl.createShader(), and compile the shader code. This is exactly the same procedure for both the vertex shader and the fragment shader. The third block creates a so-called program, which is basically a way primitives are rendered. A program can consist of several shaders, but at least we need one vertex shader and one fragment shader. The program is created with a call to gl.createProgram(), and the two shaders are attached. The program is then linked and we tell WebGL to use it in subsequent polygon rendering with a call to gl.useProgram().
If we call this code, we still don't see anything. This is because the shaders require the input variables to be set appropriately. In this case, we need to tell WebGL to provide the vertex shader with the position data from the buffer we have created above. This is done as follows, in our render function, directly before our call to gl.drawArrays:
The resulting code is functional and does what we expect. Our canvas is not red anymore but now looks as follows:
This is proof that the range of the values of gl_FragCoord are as described above. You might pause a little bit and think this through. One thing you might note is that the highest y value (480) is actually on top of the canvas. It is important to know how exactly the coordinates work here.
This is where you can start playing around. As a second example, consider the following fragment shader:
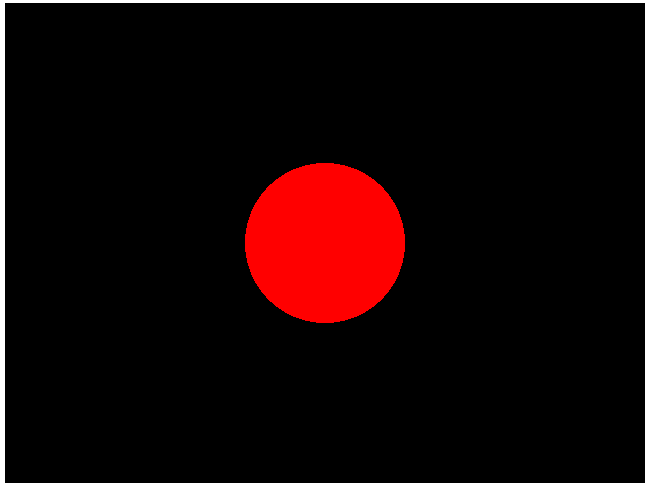
The bit at the beginning, setting the precision of the float values, seems to be necessary to use float variables in your shaders (don't ask me why there is no working default setting). As you can see, you can use simple control structures in shaders. You will probably immediately have observed what the code does. It applies the simple formula for a point lying in a two-dimensional sphere with radius 80. The result is as expected:
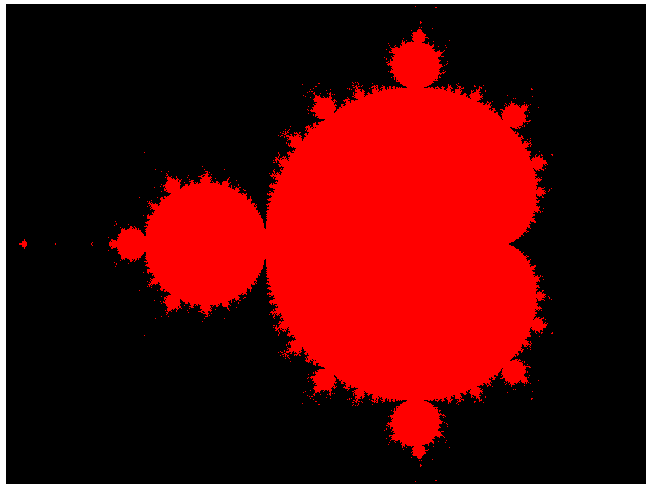
Go ahead and play around with this a little bit. What kinds of forms can you create? As a last example, let us render the Mandelbrot set. One fragment shader that does it is this one (thanks to John Tsiombikas whose website reminded me of the details of the algorithm):
Using the second variable step to remember the number of required iterations is a trick. The problem is that WebGL requires the for loop to use a local counting variable, declared in the head of the for loop. Anyway, here is the result:
Playing around with these things can be quite addictive. In fact, there are websites providing simple frameworks for playing around with fragment shaders, and whole communities revolving around them. My favourite one is www.shadertoy.com. You can share your shaders, immediately see the results, and rate them. Have fun!
15 Minuten knallharter Fokus!
In je 15 Minuten alles, was Du wissen musst!
Im KI-Umfeld muss es schnell gehen. Deswegen bieten wir euch auch einen schnellen Einstieg in die wichtigsten Data-KI-Themen. 15 Minuten Fokus, immer mit wertvollen Einblicken und Erkenntnissen aus der Praxis.
[…] Playing around with fragment shaders in WebGL. OpenGL Step by Step – OpenGL Development on Linux. Self-made GLSL shader Part II – Technical explanation(sorta) : GraphicsProgramming. §. […]
[…] fly on a per-pixel basis by using a fragment shader. This is elaborated upon in thorough detail in this excellent article by Alexander Oldemeier. Using this technique means that the image processing can be done on the […]
This was great and straight to the point. Too many tutorials I sifted through left out the implementation details of how to get the shader into a plain HTML file. Thanks!
Very concise intro, thanks! It would be good if the post would also link to a file with the working versions of the code, to see it in action and to compare it with my own code (which does not seem to display anything.)
thank you very much for the nice comment and the suggestion. I have added the source code for the last example (Mandelbrot) here: https://github.com/aoldemeier/webgl
Hope that helps (in my browser, it works — let me know if you have any problems)!
Verpasse keinen Artikel mehr und lass Dich von uns benachrichtigen, sobald es etwas Neues im Blog gibt.
Für das Handling unseres Newsletters nutzen wir den Dienst HubSpot. Mehr Informationen, insbesondere auch zu Deinem Widerrufsrecht, kannst Du jederzeit unserer Datenschutzerklärung entnehmen.
Erlebe VoiceAI
Melde dich jetzt für deinen exklusiven Demo-Termin der Mayflower VoiceAI an und überzeuge dich von dem Basissetup.
Stelle uns in diesem Termin deine Herausforderung vor und wir finden gemeinsam heraus, wie VoiceAI in deinem Szenario zum tragen kommt.
Schreibe einen Kommentar