
In the first blog post of this series, we learned how to send serialized data from a React frontend to a NestJS backend with Axios and Cap’n Proto. This blog post will focus on propagating the received data from service to service in a Kubernetes environment using NestJS clients coupled with a Nats JetStream message bus.
I will explain how to install a properly configured Nats JetStream message bus in a Kubernetes cluster using Helm and Ansible and how to connect the NestJS clients to JetStream afterward. To avoid complexity, we’ll use Minikube, an easy-to-install Kubernetes cluster with just one node. We will also partially use the code and generated data from the last blog article. Both code and data are available on GitHub.
Veraltete Software ist oft Nährboden für eine Schatten-IT, die Zeit, Qualität und Innovationen kostet.
- Beschleunigung der Prozesse – damit werden Preis- und Sortimentsanpassungen in wenigen Minuten anstelle von 30 – 50 Minuten pro Updatelauf durchgeführt.
- Höhere Datenqualität & bessere Governance durch integrierte Validierungsregeln und Plausibilitätsprüfungen.
- Entlastung und bessere Usability für Fachabteilungen – ein wichtiger Schritt gegen Schatten-IT, da fachliche Zusammenhänge sichtbar werden und aufwändige Excel-Analysen entfallen.
Individualsoftware für digitale Herausforderungen
Who is this blog for?
Since this is not a beginner’s guide, you are advised to be familiarized with K8s in a way that you understand the concepts of Kubernetes. That said, you should know how to containerize an application, push the container image to a container registry, and later pull and deploy the image into a K8s cluster. Basic knowledge of Helm and Ansible is also required.
Some basic principles
Why is opting for NestJS clients coupled with a message bus a smart play at all? Can’t we just make HTTP requests to other service endpoints in the Kubernetes cluster, similar to what we’ve done in the previous blog post?
REST is easy, comfortable, and often the appropriate choice for transferring data. However, when it comes to microservices, additional aspects must be considered.
In the previous post, we used REST to send valid Form data to a certain backend service, which validated the data and printed something to `stdout`. If there is an additional consumer endpoint that differs from the first one, we would have to explicitly extend the code logic in the frontend service by implementing this extension additionally. Since these clients use HTTP(s) links to interact with each other, a client must know what exact actions it can perform, and it must also properly handle any HTTP response states that occur. In other words, HTTP clients need a configuration that tends to fit the exact purpose of each of their mutual endpoints. A state has to be carried at every call.
Suppose a service in Kubernetes sends data to a consumer service also running in K8s, and that consumer service cannot process the data at that time. In terms of HTTP, the status would then be something like 4xx or 5xx. But, if the data would be queued on a stream system via TCP/IP, a repeated verification of the mutual state of the integrity of the services would not be necessary since it can be assumed as long as the TCP connection is open, it is valid. Messages would be queued on that message stream system until a consuming service would be alive and ready. Therefore the state of the receiving service plays not such an important role in the first place. This is widely known as self-contained services (SCS) in a distributed asynchronous system, where the services don’t rely on the other services‘ jobs. This behavior is referred to as loosely coupled, where a SCS is providing just a single purpose.
And, of course, it is technically possible to scale the receiving (HTTP) consumer behind a Kubernetes service to achieve somewhat HA (High Availability) to provide sort of a failover system. Still, a caching message queue would make the system considerably more fault tolerant and self-containing, fitting better to the principles of microservices.
The outstanding shorthanded benefits of a messaging system for event-driven microservices are:
- Loose coupling: microservices don’t have to know about other microservices. A messaging pattern with a publish/subscribe functionality allows services to process information independently.
- Scalability: a microservice architecture should be able to scale (horizontally) according to changing demands and keep the same functionality without lacking performance.
- Resiliency and error handling: a terminating service should not affect the state of other healthy services in an environment of microservices like Kubernetes, so the healthy service continues running its processes. Once the terminating service is recovered, it restarts to run its processes. If a service is invoked synchronously and an error could lead to a cascading failure to other services, a pattern like a circuit breaker comes in handy. But, in an asynchronous messaging system, a Nats JetStream-like message bus stream system would keep messages – depending on memory or underlying file system properties – to an error occurring endpoint until it is healed, or it will use scaled resource components to provide the queued messages to.
Kurze Unterbechung
Das ist dein Alltag?
Keine Sorge – Hilfe ist nah! Melde Dich unverbindlich bei uns und wir schauen uns gemeinsam an, ob und wie wir Dich unterstützen können.
Nats JetStream
Nats JetStream is a multi-tenant message bus stream system that has the ability to grant exactly one message delivery. It consists of a message publisher and a message subscriber connected to a stream. In a very abstract sense, streams are just contracts about a subject, like a description string. A stream could carry multiple subjects, and published messages on JetStream are subscribed from consumers by subjects, which is equivalent to Apache Kafka topics. There are, in general, two types of consumers: The pull consumer that explicitly requests an unacknowledged message and the push consumer that is supplied by the message bus without requesting explicitly. The push consumer is therefore considered much more efficient than the pull consumer. Acknowledging a message should prevent further deliveries to a consumer with the same exact message; hence, exactly one delivery can be achieved.
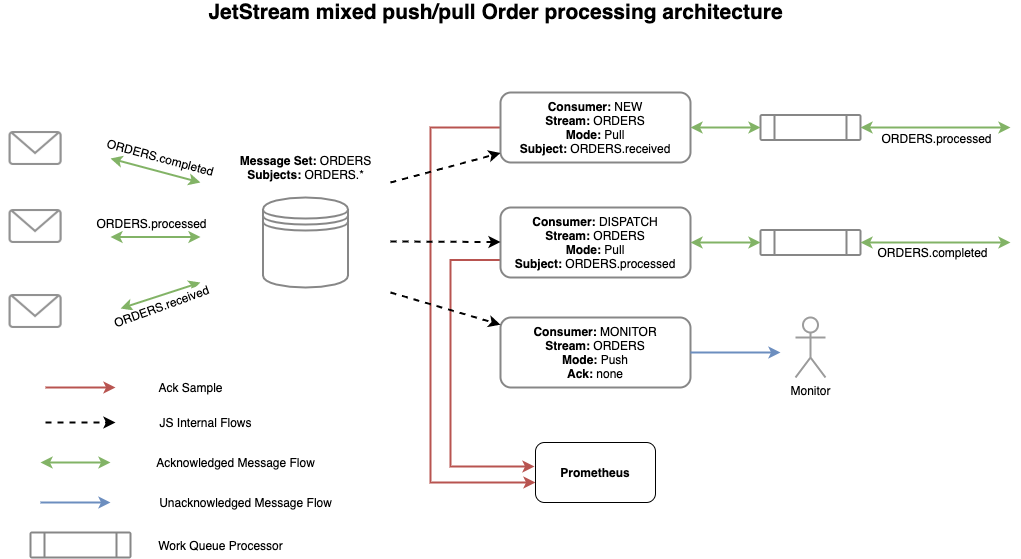
In this post, the push consumer is used. Messages published to streams are queued and will only be deleted by configurable limitations. Under certain conditions, it gives the ability to have different consumers subscribing to the same message but performing different tasks. Queued messages are stored on streams that have multiple retention policies to control their size. The storage of messages can be ephemeral in memory or persistent in a file system. JetStream is horizontally scalable and provides an agnostic payload behavior, so it is possible to put formats like string or binary on the message bus and consume that exact format on the other end. Not only the Nats peers in Kubernetes pods are scalable, but also the streams can be replicated, which then results in message replication, which are sorted by ids. This leads to a better-balanced load and more fault tolerance and resilient system.
The workflow adopted in this blog is depicted in the image below.

This blog starts with the NestJS-BE-SVC1 client service as a receiver of HTTP post requested data, publishing the serialized, received data to the Nats JetStream message bus. The NestJS-BE-SVC2 push subscriber service is connected to the message bus and consumes the message previously published by NestJS-BE-SVC1. The message bus stream system is the basic concept of this post.
Install Nats JetStream to Kubernetes
Before installing Nats JetStream on Kubernetes, your local machine and your Kubernetes repository have to be slightly modified.
Requirements
The following packages are required to install Nats JetStream in Kubernetes with Helm and Ansible:
- Python 3
- Ansible
- Helm
- Kubectl
In the root directory of your Kubernetes infrastructure project, you have to create the following empty files and additional directories:
- Makefile
- ansible.cfg
- ansible-requirements.yaml
- python-requirements.txt
- roles/
- env/
It should look like this:
project-root
|   Makefile
|   ansible.cfg
|   ansible-requirements.yaml
|   python-requirements.txt
|
|__env
|__roles
While the `roles` directory is mandatory for Ansible roles, the `env` directory is an arbitrary place where we want to store certain Helm-specific variables. The files in the `env` can also be named arbitrarily. For that reason, the name convention I decided to use in the Github Infrastructure repository is just a suggestion. You’re free to choose a naming convention that fits your preferences. To be honest, none of the variables in the `env` directory has to be stored at all; you could set them inline in Ansible scripts. But putting them together in a single directory makes this approach more straightforward and facilitates variable management. At this point, I suggest doing this the same way by following the following instruction. Later you can change it according to your preference.
The Makefile will later be the trigger to execute a certain target that covers an ansible playbook which, in response, executes an assigned role to install Nats JetStream.
Prepare required files
For that very moment, leave the Makefile empty and start with `ansible.cfg` file.
# ansible.cfg

[defaults]
host_key_checking = False
inventory = inventory
deprecation_warnings = False
interpreter_python = auto_legacy_silent
- host_key_checking: Ansible enables host key checking by default. This feature protects us against server spoofing and man-in-the-middle attacks but requires extra maintenance. As long as we are on Minikube, which is on localhost, we don’t have to care about key checking.
- inventory: it points to your local inventory file. We won’t cover Ansible inventories in this post, but it is an excellent feature to split your application into different stages. Furthermore, if not explicitly defined, Ansible will automatically create a default-like inventory file.
- deprecation_warnings: since this is a proof of concept, we don’t want to be bothered with deprecation warnings.
- interpreter_python: it checks your OS for a suitable Python interpreter and hopefully picks the right one.
The `ansible-requirements.yaml` is the next file to be prepared. It is an Ansible-Galaxy-specific file to use Ansible collections from the Ansible-Galaxy universe. Ansible Galaxy is a tool for installing Ansible collections. Ansible collections are sort of extensions that provide further pre-packed functionalities to Ansible. Like almost everything in Kubernetes it is a `.yaml` file, and we want to add collections in a key/value pair-like structure.
# ansible-requirements.yaml

---
collections:
  - name: kubernetes.core
    version: 2.3.2
- Three dashes: it defines the beginning of a yaml file. It is mandatory when multiple yaml files are combined into one file. In the excerpt above, this is only used out of convention and has no functional aspects.
- The other keys are self-explanatory. You can add as many collections as you want. If you do not specify the version, it will be set to the latest by default. I suggest following this version to generate the same output.
The `python-requirements.txt` is an Ansible-Galaxy-specific file too. Some collections need additional Python dependencies. The following dependencies are required in this context.
# python-requirements.txt

kubernetes>=12.0.0
PyYAML>=3.11
jsonpatch
- `>=` sign: it describes that the version of the package described has to be equal to or greater than the value on the right.
- If you do not specify the version, it will be set to the latest by default.
In the `env` directory, at least a `properties.yaml` file with the following content is recommended:
# properties.yaml

---
minikubeconfig: ~/.kube/config

namespace:
  messaging: messaging

version:
  nats: 0.14.2
  nack: 0.13.0
- minikubeconfig: the kubeconfig to interact with Kubernetes by kubectl, Ansible or Helm is stored as a variable to use in Ansible scripts.
- The namespace is the Kubernetes namespace we want to choose for Nats JetStream. Tip: name your Nats JetStream service namespace according to its functionality and not to the product name (like messaging instead of nats-jetstream, for instance); it’ll make it easier to understand the functional structure of your project.
- We also need to pin a version for Nats and a Controller for Kubernetes, which is called Nack.
In the `roles` directory, add a `messaging` directory and, inside it, two folders called `tasks` and `templates`. In the `tasks` folder, place a `main.yaml` file, which an Ansible playbook will later execute.
# roles/tasks/main.yaml

---
# add Nats custom resource definition for Kubernetes to interact with Nats
- name: add Nats CRD
  shell: |
    kubectl apply -f https://raw.githubusercontent.com/nats-io/nack/v0.6.0/deploy/crds.yml

# add Nats Helm repository to Helm package manager
- name: add Nats Helm repository
  kubernetes.core.helm_repository:
    name: nats
    repo_url: https://nats-io.github.io/k8s/helm/charts/

# install a certain Nats version in a predefined Kubernetes namespace
- name: install Nats from Helm chart
  kubernetes.core.helm:
    name: nats
    chart_ref: nats/nats
    chart_version: "{{ version.nats }}"
    release_namespace: "{{ namespace.messaging }}"
    update_repo_cache: true
    values: "{{ lookup('template', 'nats-values.yaml.j2') | from_yaml }}"
    state: present
    wait: true

# install Jetstream for Nats in the same namespace
- name: install Nats Jetstream from Helm chart
  kubernetes.core.helm:
    name: nack-jsc
    chart_ref: nats/nack
    chart_version: "{{ version.nack }}"
    release_namespace: "{{ namespace.messaging }}"
    update_repo_cache: true
    values: "{{ lookup('template', 'nack-values.yaml.j2') | from_yaml }}"
    state: present
    wait: true
  ignore_errors: true

# install a stream for running in Nats Jetstream
- name: deploy stream
  k8s:
    kubeconfig: "{{ minikubeconfig }}"
    state: present
    resource_definition: "{{ lookup('template', 'stream.yaml.j2') | from_yaml }}"
- The file is divided into five commands defined by a name used as a description for the following execution body.
- The strings in double curly braces are variables defined previously in the `properties.yaml`. The relation between `main.yaml` and `properties.yaml` will be defined in the Ansible playbook later.
- CRDs: in the first section of this file, the Kubernetes custom resource definition (CRD) for Nats JetStream is deployed, these are necessary to extend the Kubernetes API to handle Nats JetStream resources within the cluster.
- kubernetes.core: is the Ansible Kubernetes collection we previously specified, which is used here to execute Helm statements to install Nats, Nats JetStream, and a stream configuration.
- chart_ref: refers to the official repository.
- chart_version: the Helm chart version.
- release_namespace: the Kubernetes namespace (should be pre-installed) for this deployment (check `local-dev-messaging.yaml`).
- update_repo_cache: true: executes a Helm repo update.
- values: checks this roles template subdirectory for a `.yaml.j2` file.
- resource_definition: this section looks (`lookup`) in this roles template subdirectory for a `stream.yaml.j2` template.
The Jinja templates in the `templates` folder are used to inject env variables from one yaml file into another. This is kind of a workaround since pure Kubernetes yaml does not understand the concept of variables. An alternative concept to that workaround would be self-managed Helm files; since this approach focuses on JetStream, we will keep it simple here.
For the basic Nats installation within the `roles/tasks/main.yaml` file, the following properties for Nats also must be defined in a `nats-values.yaml.j2` file:
# roles/templates/nats-values.yaml.j2

nats:
  image: nats:2.6.5-alpine
  jetstream:
    enabled: true
  memStorage:
    enabled: true
    size: 4Gi

  fileStorage:refers to the official repo
  enabled: true
  size: 5Gi
  storageDirectory: /data/

  logging:
    debug: true
    logtime: true

cluster:
  enabled: true
  replicas: 3
  noAdvertise: false
- image: Predefined nats image.
- jetstream.enabled: true: since JetStream is a built-in on top of Nats, it has to be explicitly enabled here.
- memStorage/fileStorage: memory storage should be used. Due to a current bug on this version, Nats servers are not synchronizing perfectly while the file storage feature is missing, so it is enabled here.
- logging: while developing, the debug state is enabled with displayed logtime.
- cluster: we enabled 3 Nats peers; each Peer will start in their own Kubernetes Pod.
- cluster.noAdvertise: false: we set this to false to enable passing internal addresses of pods in Kubernetes to Nats JetStream clients. It just sounds a little weird because of the double negative.
The Nats JetStream controller called Nack will watch the state of Nats JetStream in Kubernetes. It will be installed within `roles/tasks/main.yaml`, but some additional values have to be defined first in the `nack-values.yaml.j2` file to enable it correctly:
# roles/templates/nack-values.yaml.j2

jetstream:
  enabled: true
  image: natsio/jetstream-controller:0.6.1
  pullPolicy: Always
  nats:
    url: nats://nats:4222
- jetstream.enabled: true: JetStream has to be explicitly enabled here too.
- image: provides the JetStream controller image for Kubernetes.
- pullPolicy: this image should always be pulled.
- nats.url: the Nats documentation suggests this URL to use, so it is adopted here.
Last but not least, we have to define a `stream.yaml.j2` to set a stream configuration in Nats JetStream. It sets the stream limits policy and defines if messages are stored in memory or file storage. This could possibly be done within the NestJs clients. Still, since we are trying to execute consistent, repeatable routines at an infrastructure level (IaC), the configuration is provided here. It will be executed within the `roles/tasks/main.yaml` file.
# roles/templates/stream.yaml.j2
---
apiVersion: jetstream.nats.io/v1beta2
kind: Stream
metadata:
  name: stream
  namespace: { { namespace.messaging } }
spec:
  name: stream
  subjects: [ "contact-person" ]
  maxBytes: 500000000
  storage: memory
  retention: limits
  discard: old
  replicas: 3
- apiVersion: the Nats JetStream API version defined by its CRD.
- kind: Stream: is not a Kubernetes native kind and is only available because of the Kubernetes API extension provided by the Nats CRD.
- metadata: the name is arbitrary, but the namespace should be the same as for every other Nats resource in the Kubernetes cluster.
- subjects: this property is important because it’s the subject that will connect Nats clients to a particular stream.
- The retention policy/limits for this stream is/are defined like:
- Scaled by 3 (fault tolerance and performance gain).
- Memory for stream data is 500 MB.
- Memory will be managed by deleting `old` messages when memory limits are exceeded. Acknowledged messages will be deleted before unacknowledged messages.
Now, all elements that are called within the `roles/tasks/main.yaml` file are specified. At this point, you should have the following project structure in your Kubernetes project:
project-root
|   Makefile
|   ansible.cfg
|   ansible-requirements.yaml
|   python-requirements.txt
|
|__env
|  |  properties.yaml
|__roles
|  |__messaging
|     |__tasks
|     |   main.yaml
|     |__templates
|     |   nack-values.yaml.j2
|     |   nats-values.yaml.j2
|     |   stream.yaml.j2
Trigger install
Everything done so far was a preparation to install Nats JetStream to Kubernetes finally. To proceed with the installation setup, add `local-dev-messaging.yaml` to the project root. This file defines an Ansible playbook which can be executed by running `$ ansible-playbook local-dev-messaging.yaml` or adding this statement as a target to a Makefile. The purpose of that file is to execute the `roles/tasks/main.yaml` we prepared before. But first, you have to set some instructions in this file.
# local-dev-messaging.yaml

---
- name: deploy NATS JetStream
  hosts: localhost
  gather_facts: false
  become: false
  vars_files:
    - "env/properties.yaml"
  roles:
    - { role: messaging, tags: messaging }
  pre_tasks:
    - name: create namespace 'messaging'
      k8s:
        name: "{{ namespace.messaging }}"
        kind: Namespace
        state: present
        kubeconfig: "{{ minikubeconfig }}"
- hosts: since we are on localhost for local development, this is localhost.
- gather_facts: set to false because no facts from the remote host (which is localhost here) are necessary for installing this role.
- become: no user change operations are required here.
- vars_file: refers to `properties.yaml` to use the predefined environment variables during the installation process. This provides variables to use, e.g., in the templates `.yaml.j2` files. This relation is essential to use all variables defined in this file for the whole installation process.
- roles: the exact role we predefined earlier at `roles/messaging` that has a mandatory `main.yaml`, which executes your instructions to install JetStream to a defined namespace.
- pre_tasks: it is a Kubernetes best practice to use a separate namespace for a certain feature. This instruction simply creates that namespace before executing the `/roles/messaging/tasks/main.yaml`. As mentioned earlier, this is necessary because the namespace is used in the cascading executed file `roles/tasks/main.yaml`.
You are almost there! It would be simple enough to just execute that playbook like `$ ansible-playbook local-dev-messaging.yaml`. But since you would set up multiple Ansible playbooks for different tasks (like an ingress controller, for instance), triggering them by a major file is more comfortable. As stated earlier, a Makefile as a trigger could be very handy in this case. A target for the Ansible playbook is defined in the following file:
# Makefile

.PHONY: setup-galaxy use-context

install: install-messaging

use-context:
	 kubectl config use-context minikube

setup-galaxy:
	ansible-galaxy collection install -r ansible-requirements.yaml
	pip install -r python-requirements.txt

install-messaging: setup-galaxy use-context
	ansible-playbook local-dev-messaging.yaml
- Phony targets: these are recipes used by the following targets to install Ansible galaxy and use Minikube Kubeconfig with Kubectl, Ansible, and Helm statement executions. Otherwise, a command, such as `$ export KUBECONFIG=~/.kube/config`, would be necessary to point KUBECONFIG to the correct Kubernetes configuration.
- install: this target executes the install-messaging target, which in turn executes `setup-galaxy` and `use-context` before the playbook is executed.
Installation
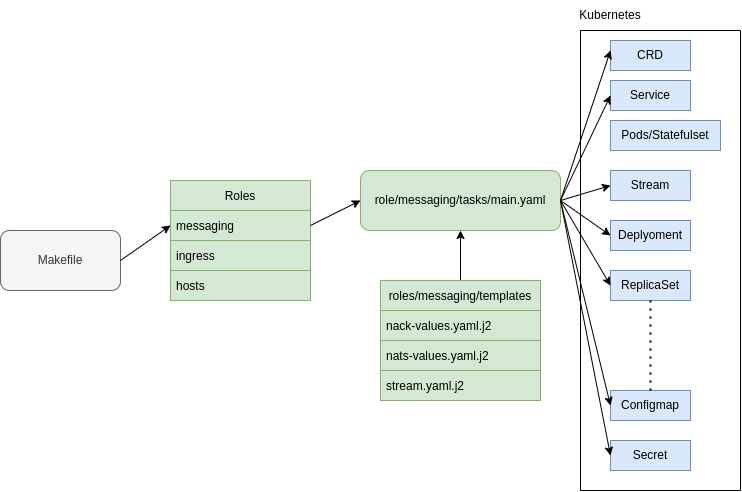
To install Nats JetStream to Kubernetes, execute `$ make install` from the project root in a terminal. That command runs as stated before the „setup-galaxy“ and „use-context“ operations before executing the „install-messaging“ target, which consecutively runs the ansible-playbook for Nats JetStream. If we’ve configured everything properly, the installation should generate at least 3 Nats stateful Pods in the namespace messaging within the chosen Kubernetes cluster.
For a better understanding of the cascading file dependencies, the process is depicted in the following. The target within the `Makefile` is addressing a role. The main.yaml inside a role tasks folder is executing an Ansible script to install a Helm resource to Kubernetes by using specific configurations from a templates subdirectory in the same roles directory.
If the install process was successful, all Kubernetes specific Nats resources like Pods, Services, and ConfigMaps should be running inside the cluster. Check it by executing `$ kubectl get all -n messaging`.
Connect clients to Nats JetStream
In this section, we’ll connect NestJS clients to Nats JetStream by performing the three following steps:
- Create a config file for the Nats JetStream connection.
- Actually, call that connection.
- Publish/Subscribe to the Cap’n Proto data.
As mentioned before, there are two clients that have to be configured NestJS-BE-SVC1(publisher) and NestJS-BE-SVC2(subscriber). One for publishing incoming data to JetStream and the other for subscribing from JetStream. Publisher and subscriber are configured similarly for the nats connection but differ in the way how they handle the data with the TCP/IP stream-like connection. Cap’n Proto is used as a data vehicle, but it could be anything like string or JSON (agnostic payload behavior). The first two steps are similar to publisher and subscriber/consumer clients.
The clients can be found on Github app services. Create `/src/config.nats.ts` as a JetStream configuration in NestJs to provide a TCP connection to a given server URL. The configuration is to be tested later with Kubernetes port forwards on localhost, so the server’s URL contains the localhost string.
// src/config.nats.ts

export const natsStreamConfig = {
    strategy: new NatsTransportStrategy({
        connection: {
            servers: ["nats://localhost:4222"],
        },
        streams: [
            {
                name: "stream",
                subjects: ["contact-person"],
            },
        ],
    }),
};
We use the stream configuration defined earlier within the Nats installation. stream[0].name and stream[0].subjects has its origin in the roles/messaging/templates/stream.yaml.j2 file.
Although containerization and registry upload will not be discussed in this article, the Dockerfiles are included in the Github repository. Still, you have to use your own Docker or alternative container registry and also generate a Kubernetes secret for that registry (use the secret.yaml.j2.sample from the GitHub repository located at infrastructure/minikube/roles/capnproto/common/templates/secrets.yaml.j2.sample). You could simply use the existing Kubernetes deployment in the repository for those containers by fixing the image source to your chosen registry. If the NestJS applications are running within Kubernetes this local servers: ["nats://localhost:4222"] URL has to be changed to be suitable for Kubernetes DNS: servers: ["nats.messaging:4222"].
Help: How to NestJs To K8s.
Create `/src/main.ts`. This file bootstraps the NestJs application as a whole, so the predefined `nats.ts` has to be imported and called to set a Nats JetStream connection.
// src/main.ts

async function bootstrap() {
    const app = await NestFactory.create(DatasModule, {cors: true});
    //here:
    app.connectMicroservice(natsStreamConfig);
    app.startAllMicroservices();

    await app.listen(3001);
}

bootstrap();
Reminder
Where does the data come from that we want to process in NestJS-BE-SVC1(publisher)? In the frontend, Form data is submitted. The submit-triggers a post request to the URL of this service (`http://localhost:3001/datas/number if executed locally`), and the NestJS-BE-SVC1(publisher) service, in turn, publishes data on the Nats JetStream message bus by adding the subject „contact-person“ to the incoming data that is serialized already.
First blog post
An excerpt of the managing NestJs controller (NestJS-BE-SVC1(publisher)) is shown below:
// src/datas/datas.controller.ts

interface DudeNumberArray {
    dude: Array<number>
}

@Controller('datas')
export class DatasController {

    private natsClient = new NatsClient();

    @Post('number')
    public createMessageFromNumberArray(@Body() messageValues: DudeNumberArray): void {
        this.natsClient.emit("contact-person", messageValues.dude);
    }
The `this.natsClient.emit(„contact-person“, messageValues.dude)` is basically all it takes to publish data to Nats JetStream. Adding a (1)Nats client and (2)emitting the incoming data with a predefined subject to JetStream. Since the payload in the previous blog post was a number array (containing the Cap’n Proto serialized data), it is used this way in this blog post. As mentioned before, Nats JetStream has a payload agnostic behavior. Hence it could be anything like string, JSON, or binary, for instance.
For the consumer application (NestJS-BE-SVC2(subscriber)), which subscribes to messages from the predefined stream by subject, the associated controller class could be implemented as follows:
// src/datas/datas.controller.ts

@Controller("datas")
export class DatasController {
    private natsClient = new NatsClient();

    constructor(private datasService: DatasService) {
    }

    @EventPattern("contact-person")
    public subscribeMessage(
        @Payload() data: Array<number>,
        @Ctx() context: NatsContext
    ): void {
        const typedArr = Uint8Array.from(data);
        const message = new capnp.Message(typedArr, false, false);
        const person = message.getRoot(Person);
        const phoneNumbers = person.getPhones();
        const date = person.getBirthdate();

        console.log(person.getName(), person.getEmail());

        phoneNumbers.forEach((i) => {
            i.getNumber();
            i.getType();
            console.log(i.getNumber());
            console.log(i.getType());
        });

        console.log(date.getDay(), date.getMonth(), date.getYear());
    }
}
The most important part of this controller function is the `@EventPattern` annotation and the function parameters of the `subscribeMessage` function. This information is mandatory, except for the data parameter type. This would be whatever the chosen payload type is. In this case, it’s Cap’n Proto binary wrapped in a TypeScript `Array<number>`. The function body extracts the Cap’n Proto binary and deserializes it like it was done before in the previous blog post. In case you wonder why the incoming message is not acknowledged in this example. At this point, we use the auto-ack feature of Nats JetStream, which acknowledges a message when it is received by the subscriber. It is worth mentioning that in addition to the auto-ack function, manual acknowledgment could also be implemented.
Give it a shot
Before containerizing the applications and uploading them to a container registry, try it out locally. For this purpose, we need to use the Nats JetStream message bus running in the Kubernetes cluster already. But, this should not be a major problem because you could port forward JetStream to your local machine like this: `$ kubectl port-forward -n messaging svc/nats 4222 8222 7777 6222`. The NestJS clients are at this state configured for local testing already because the TCP handshake will be done with `nats://localhost:4222`. The next thing to do is start the NestJS services and trigger a request which in turn triggers a publish to the message bus and sends a message to the subscriber.
The easiest way to perform testing of this setup would be to clone the repository and follow the instructions in the README.md.
Where to go from here
Among many things that are recommended to consider next, I would point out the following:
- Containerizing the backend services
- Upload images to a container registry
- Create a Kubernetes deployment for each backend service
- Install Ingress to Kubernetes and configure it (Ingress route, e.g.)
- Communication over Ingress with backend service that triggers a publish to message bus
Conclusion
This is a very simple example of connecting NestJs or at least NodeJs client services to a Nats JetStream message bus system. Even though we could define the Nats JetStream client configuration within the client code, we adopt one of the main concepts of Infrastructure as Code (IaC), which recommends that all tasks that can be configured and automated should also be handled at a structural level. Therefore, the configuration was rolled out by Ansible, while the clients only needed to connect to a fully managed system by establishing a TCP handshake.
The client code is on a very basic level. Therefore no connection errors are caught yet in this example, nor is any major error handling rolled out. However, the focus was to show how to separate the infrastructure layer from the app layer and how the services could be connected to the message bus and propagate a serialized Cap’n Proto message.
It is essential to understand that our services, which are designed to run in a Kubernetes environment, could easily be replaced by services from other programming languages and libraries without affecting the infrastructure layer, as long as the Nats JetStream pub/sub endpoint logic is implemented in a similar manner.

Schreibe einen Kommentar