In a recent project for a Mayflower client, we used Quarkus Java Microservices with Google Protobuf. In a very abstract sense, our objective was to exchange serialized binary data over a message bus system living in Kubernetes. Therefore I decided to replace the existing tech stack with Typescript, NestJS, and Cap’n Proto IDL (Interactive Data Language).
In this blog post, I will show you how to serialize data using Cap’n Proto in React and send it to a NestJS receiver, which simulates a backend.
Cap’n Proto
Like Google Protobuf, Cap’n Proto (CP) is an interchange format and RPC system that is strongly typed and compiled to binary. Unlike JSON, the binary file generated after compilation is a human unreadable text format.
When the Cap’n Proto schema is compiled, classes are generated with accessor methods to extract human-readable data. This behavior is very similar to Google Protobuf and may not be that surprising when you realize that the founder and developer of Cap’n Proto was heavily involved in the development of Google Protobuf version 2. There are some common aspects between these two IDLs as they are both developed in C++ and have a similar schema language, although CP has some handy features like unions and dynamically typed fields. Cap’n Proto claims to be considerably faster, and there is indeed some evidence of it.
On a discussion on Hacker News, Kenton Varda stated:
For message-passing scenarios, Cap’n Proto is an incremental improvement over Protobufs — faster, but still O(n), since you have to build the messages. For loading large data files from disk, though, Cap’n Proto is a paradigm shift, allowing O(1) random access.
The founder of Cap’n Proto, further discussed in this topic:
Some people use the term „zero-copy“ to mean only that when the message contains a string or byte array, the parsed representation of those specific fields will point back into the original message buffer, rather than having to allocate a copy of the bytes at parse time.
Cap’n Proto in contrast …
… it’s not just strings and byte buffers that are zero-copy, it’s the entire data structure. With these systems (zero-copy of an entire data structure), once you have the bytes of a message mapped into memory, you do not need to do any „parse“ step at all before you start using the message.
In contrast …
… Protobuf encoding is a list of tag-value pairs each of which has variable width. In order to read any particular value, you must, at the very least, linearly scan through the tag-values until you find the one you want. But in practice, you usually want to read more than one value, at which point the only way to avoid O(n^2) time complexity while keeping things sane is to parse the entire message tree into a different set of in-memory data structures allocated on the heap.
The term zero-copy means that data is read from the wire into a useful memory data structure without any further serialization or encoding. However, it does require arena allocation (C++ feature) to ensure that all objects in the buffered message are allocated coherently. In fact, this could make memory allocation for Cap’n Proto objects significantly faster, but when working with Cap’n Proto this implementation means that deleting objects is only possible by deleting the entire message and freeing the entire allocated arena. Although it would be technically feasible to delete specific areas of an arena with C++, this approach isn’t available when using Cap’n Proto.
Kurze Unterbechung
Das ist dein Alltag?
Keine Sorge – Hilfe ist nah! Melde Dich unverbindlich bei uns und wir schauen uns gemeinsam an, ob und wie wir Dich unterstützen können.
Serialization/deserialization with Cap’n Proto!
Using ReactJS and Formik, I created a form whose data is submitted to a NestJS client with Axios (HTTP request). The entire implementation code is available on GitHub.
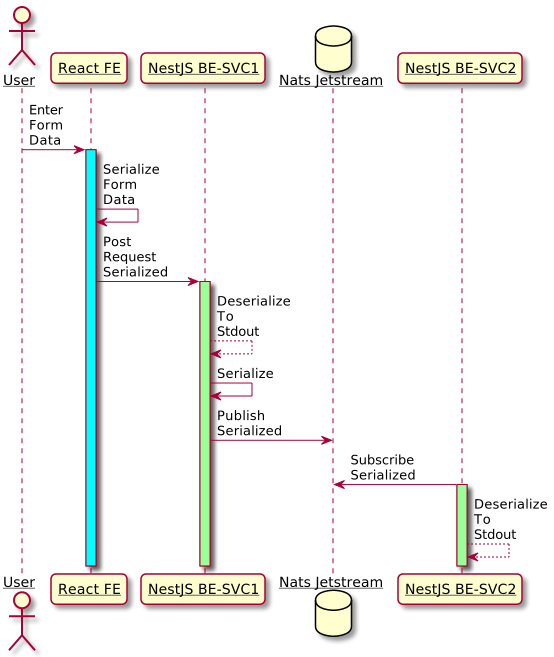
The following sequence diagram describes the adopted workflow. This blog does not discuss publishing on Nats Jetstream. Nevertheless, the complete workflow is attached here for a better understanding.

The following is a very simple and typical example of the React form data that could be transferred to a Cap’n Proto schema. The CP IDL represents the exact data from this single-page app.

With the schema language, we defined a strongly-typed schema divided into composite datatypes, respectively objects like Struct. These objects must be numbered starting from zero. The docu describes this as:
A tree of objects, with the root always being a Struct. If the schema is changed, it must be completely recompiled to provide the correct corresponding accessor methods. The schema is a representation of the form displayed above.
# Cap'n Proto schema IDL
@0xb517f58004a64978;
struct Person {
name @0 :Text;
email @1 :Text;
phones @2 :List(PhoneNumber);
birthdate @3 :Date;
struct PhoneNumber {
number @0 :Text;
type @1 :Type;
enum Type {
mobile @0;
home @1;
work @2;
}
}
struct Date {
year @0 :Int16;
month @1 :UInt8;
day @2 :UInt8;
}
}
The very first line is a unique 64-bit ID that is mandatory for every Cap’n Proto schema. It can be generated as follows $ capnp id. Cap’n Proto documentation explains very well how to install the tools to compile the schema. The schema is compiled with $ capnpc -o node_modules/.bin/capnpc-ts src/capnproto/contact.capnp and obviously a NodeJS module is required for compilation. After a successful compilation of the schema, a .js and a .ts file with the accessor methods should be generated.
The accessor methods provide the data mapping to the schema. They can be called by importing it to a TypeScript service. A TypeScript interface could also help to represent the CP schema and facilitate subsequent serialization. The following interface represents the CP schema and facilitates mapping certain values, such as the initial form values in this example, which must be set to submit the form correctly.
// typescript interface representation of Cap'n Proto schema

interface Values {
  fullname: string;
  email: string;
  phones: [
    {
      number: string;
      type: number;
    }
  ];
  birthdate: Date;
}
With the precompiled schema and the Values interface definition, the following serialization is quite simple:
- Create a CP message.
- Initialize the message with the precompiled
Personclass, which also contains the accessor methods - Map values via the accessor methods to the CP schema.
- Return an
ArrayBuffer
// serialization to Cap'n Proto data
export const serialize = (values: Values): ArrayBuffer => {
// 1.
const message = new capnp.Message();
// 2.
const person = message.initRoot(Person);
// 3.
person.setName(values.fullname);
person.setEmail(values.email);
const phoneNumber = person.initPhones(values.phones.length);
phoneNumber.forEach((i, j) => {
i.setNumber(values.phones[j].number);
i.setType(values.phones[j].type);
});
const date = person.initBirthdate();
date.setYear(new Date(values.birthdate).getUTCFullYear());
date.setMonth(new Date(values.birthdate).getUTCMonth() + 1);
date.setDay(new Date(values.birthdate).getDate());
// 4.
return message.toArrayBuffer();
};
Deserialization works almost the same way as serialization, using the precompiled accessor methods of the Person schema to extract the data from the serialized message. The parameters (1) of the message are an ArrayBuffer and two Boolean values, which indicate whether the message is packed or provided as a single segment.
A single-segment message is convenient, but it must be clear from the beginning how long the actual message will be since it has to be initialized with the correct length. This is often difficult and not helpful; for that reason, we described a multi-segment message in the following example. Here the size of the segments can vary.
// deserialization from Cap'n Proto to readable data
export const deserialize = (data: ArrayBuffer): void => {
// (1)
const message = new capnp.Message(data, false, false);
const person = message.getRoot(Person);
const phoneNumbers = person.getPhones();
const date = person.getBirthdate();
phoneNumbers.forEach((i) => {
i.getNumber();
i.getType();
});
};
So far, so good. If everything worked as expected, data have been serialized and deserialized to and from a local ArrayBuffer with Cap’n Proto in TypeScript.
The thing with ArrayBuffers
In general, this approach describes how binary data is sent from a frontend application to a backend API via HTTP. This project uses axios to implement the HTTP post request in React.
At this point, there is only an ArrayBuffer, which is a data structure that can hold a certain amount of binary data. An ArrayBuffer in TypeScript simply represents an allocated space in physical memory. To read data from an ArrayBuffer, you would pass a reference to it, but that is not possible when sending the data via an HTTP request. In this case, you would decouple the reference from the physical memory; by doing it so, the data will no longer be deserializable. JavaScript typed arrays would be a good solution for reading and writing binary data in ArrayBuffers.
Deserialize sent payload
To deserialize transferred data in a backend service, I use typed arrays from number arrays. To realize this in the following, [].slice function returns a function object that has the method option call(), making the function behave as if it was called by the first parameter of call(). In short, we created a new Uint8Array and initialized an array with its values. As a result, we get a number array.
// create transferrable data
export const createPayload = (values: Values): Array<number> => {
const contactPerson: ArrayBuffer = serialize(values);
// Transfer Uint8Array values to number array
return [].slice.call(
new Uint8Array(contactPerson, 0, contactPerson.byteLength)
);
};
Now we could use the following submitPost function to send the data (Array<number>) by calling the above defined createPayload function.
// http post data to an endpoint

function submitPost(values: Values): void {
  axios
    .post(
      "http://<app-backend-url>",
      { dude: createPayload(values) },
      {
        headers: {
          "Content-Type": "application/json",
        },
      }
    )
    .then((response) => {
      console.log("Status: ", response.status);
      console.log("Data: ", response.data);
    })
    .catch((error) => {
      console.error("Something went wrong!", error);
    });
}
The received data in the backend service can now be deserialized. Therefore, I recreated a (1) typed array from the received payload. With the typed array, it is now possible to (2) create a message representation and extract (3) human-readable data.
// deserialize transferred data back to readable data
public deserializeMessage(data: Array<number>) {
// (1)
const typedArr = Uint8Array.from(data);
// (2)
const message = new capnp.Message(typedArr, false, false);
// (3)
const person = message.getRoot(Person);
const phoneNumbers = person.getPhones();
const date = person.getBirthdate();
phoneNumbers.forEach((i) => {
i.getNumber();
i.getType();
});
}
Conclusion
Like Google Protobuf or Flatbuffers, Cap’n Proto is an interchange format with its own IDL. Captain Proto is strongly typed and compiled into binary format. Accessor methods can be used to map values easily to a message.
The expenditure of the serialization and deserialization is quite small and almost self-describing and intuitive by the precompiled accessor methods. Only that the data must be first transferred from an ArrayBuffer into a typed array is somewhat getting used to since a Uint8Array is created automatically and transferred to a buffer by the Cap’n Proto library. So to get a Uint8Array, which could be transferred between endpoints, a typed array has to be rebuilt from the buffer. This feels like two steps forward and one step back and, therefore, a little strange.
Personally, I really like Captain proto’s schema language, especially the ability to pass union types, which is currently not possible with Google Protobuf.


Schreibe einen Kommentar