Introduction:

If you are looking around the news, you find some topics about small mobile applications (app). You can use them for a lot of different things, making your life easier. They enhance your everyday life, if you want to receive the latest stock exchange news, play some games, communicate with your friends or exchange the latest news.
If you want to write your own app, there are some sites with a lot of information, how you can do that. For our app „phpMyFAQ WebOS“-Client we use the Palm Mojo Software Development Kit to build our own webOS app.
Prepare/Installation:
 Before you are able to install the webOS SDK, you have to perform the VirtualBox installation. It is required, because the emulator is built on the VirtualBox (Sun Virtual Box). Additionally you have to ensure that the JDK is installed on your machine. To verify Java whether is installed, go to the Command Prompt and type: java -version. If Java is installed, the version number should appear.
After that, you can install the Palm Mojo SDK. It is available for several operation systems like Mac OS X, Linux and Windows. We use the Windows SDK for our app. You can download it from the offical website http://developer.palm.com/ and follow the installation steps. Note that the VirtualBox must not run during SDK installation. Next step for the installation will be the Eclipse Plugin, that you may find here: http://cdn.download´s.palm.com/sdkdownloads/eclipse-update-site/site.xml. It is very useful for creating a new Mojo app and helps you launching the app to the VirtualBox environment.
You can create the basic structure with a few clicks. It is very easy. In the File menu, select New -> other -> Palm webOS -> Mojo Application and click Finish. For our small app we need two pages that contain two steps. The first one with an input field where you can type in search strings and a send button. On the second page you get the result set displayed as a list. With the back button you may go back to the first page.
Structure:
Our webOS app has the following structure:
app
- assistants– contains the main functionality of the application
- resulst-assistant.js
- search-assistant.js
- stage-assistant.js
- models
- views– directory for the different scenes
- result
- emptylist.html
- listcontainer.html
- listitem.html
- result-scene.html
- search
- search-scene.html
images
- logo.png – phpMyFaq-logo which is displayed in the Home-screen
javascript
- result_info.js – contains the details and settings for the result-scene
- settings.js – general application setting
stylesheets
- phpmyfaqwebos.css – customized stylesheet
- appinfo.json – Contains the details necessary to launch the application
- framework_config.json – Configuration-settings for the Framework
- icon.png – Icon of the Application
- index.html – Defines the main layout
- sources.json – Contains the available assistants and views
The Application life-cycle:
After selecting the Application in the launcher the webOS-Framework calls the stage-assistant. In our case we used them
to show the „search“-scene.
StageAssistant.prototype.setup = function() {
	this.controller.pushScene('search');
}
Search-assistant.js implements the ajax-request to the rest-service. First of all we build the necessary form with the attributes, models
and the listeners in the „Setup“-function:
/*
 * Attributes
 */
this.searchField = {
    hintText:         'Searchkey',
    textFieldName:    'search',
    modelProperty:    'original',
    multiline:        false,
    disabledProperty: 'disabled',
    focus:            true,
    modifierState:    Mojo.Widget.capsLock,
    limitResize:      false,
    holdToEnable:     false,
    focusMode:        Mojo.Widget.focusSelectMode,
    changeOnKeyPress: true,
    textReplacement:  false,
    maxLength:        30,
    requiresEnterKey: false
};

/*
 * Model
 */
this.searchModel = {
    original: '',
    disabled: false
};

/*
 * Setup-Widget
 */
this.controller.setupWidget('search', this.searchField, this.searchModel);
After setting up the listener and the form we have to implement the ajax-request:
    /*
     * Get FAQ-Results
     */
    var request = new Ajax.Request( PMF_URL + this.searchModel.original, {
        method: "get",
        evalJSON: "true",
        onSuccess: function(transport) {
            responseJSON = transport.responseJSON;

        }
    });
When we receive results from the FAQ-page we only push the application to the next scene:
this.controller.stageController.pushScene('result', responseJSON);
The search-assistant transfers the received JSON-set as an argument to the result-assistant where the
information will be presented:
    this.attributes = {
            itemTemplate: 'result/listitem',
            listTemplate: 'result/listcontainer',
            swipeToDelete: true,
            renderLimit: 40,
            reorderable: false,
            autoconfirmDelete: true,
            emptyTemplate:'result/emptylist'
    };
    this.model = {
            listTitle: "Search Result",
            items: result
    };
    this.controller.setupWidget("pushList", this.attributes, this.model);
„this.attributes“ defines the „listcontainer“ for the general layout of the list and „listitems“ the structure
of the rows:
/*
* listcontainer
*/
<div class="palm-group">
<div class="palm-group-title">
#{listTitle}
</div>
<div class="palm-list">
#{-listElements}
</div>
</div>
/*
* listitem
*/
<div class="palm-row pushListItem">
<div class="listWrapper">
<div class="listQuestion">#{question}. </div>
<div><a class="listAnswer" href="#{link}">#{answer}</a></div>
</div>
</div>
User-Interface:
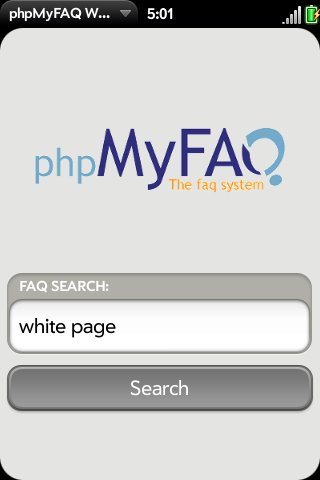
Step 1
Displays the search input screen where the user can type in keywords. Clicking the „Search“-button will send a request to a rest interface and process the data. The page two will be displayed after clicking.
Step 2
Shows the search result set. Every row contains a question and the related answer. If you click on the answer you will be forwarded to the original phpMyFAQ page. With the „Back“-button you can go back to the previous site.


Schreibe einen Kommentar