
Nowadays, software developers work on multiple projects at the same time. The projects usually present distinct requirements. Nevertheless, they must be reproduced identically in multiple machines, and sometimes they have to live in the same hardware – the developer’s computer. The so-called container technology stands out among the different approaches used to reproduce software projects reliably.
A container is a standard unit of software used to build a virtualized operational system (OS). The container’s OS has control over some components of the host system and can isolate the processes related to the container’s services. This isolation enhances the reproducibility of the containerized application. The container technology has been developed since the 2000s, but in 2013, when Docker was introduced to the community, its popularity has exploded.
Veraltete Software ist oft Nährboden für eine Schatten-IT, die Zeit, Qualität und Innovationen kostet.
- Beschleunigung der Prozesse – damit werden Preis- und Sortimentsanpassungen in wenigen Minuten anstelle von 30 – 50 Minuten pro Updatelauf durchgeführt.
- Höhere Datenqualität & bessere Governance durch integrierte Validierungsregeln und Plausibilitätsprüfungen.
- Entlastung und bessere Usability für Fachabteilungen – ein wichtiger Schritt gegen Schatten-IT, da fachliche Zusammenhänge sichtbar werden und aufwändige Excel-Analysen entfallen.
Individualsoftware für digitale Herausforderungen
In this tutorial, you will learn how to use Docker containers to isolate the services of a web application regarding the development environment. The application stack to be containerized is formed by three layers, the database layer (PostgreSQL), the API/backend layer (Django), and the APP/frontend layer (React). Each stack layer will be isolated in a container and should be fully reproducible, meaning that anyone (any machine with minimum requirements) will be able to run our containers and completely reproduce our application!
To better organize this tutorial, it is split into four stages:
- Stage 0: Foundation –
stage0-base - Stage 1: Django API –
stage1-django - Stage 2: PostgreSQL Database –
stage2-psql - Stage 3: React APP –
stage3-react
At the end of each stage, we will have the respective service running in a Docker container. The progress of each stage was committed to the tutorial’s Git repository in a separate branch. You can clone the Git repository into your local machine, and if something goes wrong, you can shift among the branches as you wish.
Containerizing Django and React with Docker
Docker containers hold a whole OS. Therefore, packages installed in containers can be used to execute commands and manage the containers‘ files. To manage the containers and sync with the tutorial’s Git repository, we must have the following packages installed in our system:
- Git
git 2.35
- Docker
docker 20.10docker-compose 1.29
Infomation regarding versions
You can still use the newer version of the packages, but be aware that sometimes you may reproduce different outputs.Stage 0: Foundation
In the initial stage, we will build the foundation of our project. Since learning the basics of Django and React is not in the scope of this tutorial, we will clone the tutorial’s Git repository to set up both backend and frontend locally. After that, we will be able to start configuring our containers.
Kurze Unterbechung
Das ist dein Alltag?
Keine Sorge – Hilfe ist nah! Melde Dich unverbindlich bei uns und wir schauen uns gemeinsam an, ob und wie wir Dich unterstützen können.
Create the local repository ~/mayflower, clone the Git repository into it, and check out the branch stage0-base.
 mkdir ~/mayflower
  cd ~/mayflower
  git clone https://github.com/rodolfoksveiga/docker-django-react.git .
  git checkout stage0-base
After cloning the repository, we have two subdirectories inside ~/mayflower: ./api (backend) and ./app (frontend).
The backend is a simple django API that exposes the /api/students endpoint. In this endpoint, we can fetch (GET) all the records from the Student model as a JSON. Student is a user-defined model with two fields: id and name.
The frontend is a React APP that contains only one page, defined in ~/mayflower/app/src/App.js. When the page is rendered, we try to fetch the data from our API and print a list with all the students fetched or handle inconsistencies.
At this point, we still cannot test our application because we have not installed all the packages necessary to run it on the host machine, and we still have not set up the Docker containers. So I ask you to trust me for now, and I promise you that soon we will have the application running in containers so that we can play around with it.
Stage 1: Backend (Django)
In this stage, we will set up the backend in a Docker container that will soon interact with the database and the frontend. The container will hold the Django RESTful API we have cloned previously. As expected, the API will be able to manage the database, i.e., to perform CRUD operations (Create, Read, Update, and Delete).
1. Environment File
Create the file ~/mayflower/api/.env. This environment file will contain the credentials of our project – the credentials will be loaded in the container as environment variables when it starts.
   DJANGO_SUPERUSER_EMAIL = 'admin@mayflower.com'
   DJANGO_SUPERUSER_USERNAME = 'admin'
   DJANGO_SUPERUSER_PASSWORD = 'mayflower'
In this file, we created three environment variables (DJANGO_SUPERUSER_EMAIL, DJANGO_SUPERUSER_USERNAME, and DJANGO_SUPERUSER_PASSWORD), which correspond to credentials for a Django Admin super user which have access to http://localhost:8000/admin.
Attention
In a professional project, we should not expose this file to unauthorized people since it contains sensitive data.2. Executable File
Create the executable file ~/mayflower/api/entrypoint.sh. For convenience and to enhance reproducibility, this file will manage the database migrations, create a Django superuser, and run the backend server every time we start the container.
   #!/bin/sh

   pipenv run python manage.py makemigrations
   pipenv run python manage.py migrate
   pipenv run python manage.py createsuperuser --no-input
   pipenv run python manage.py runserver 0.0.0.0:8000
Using pipenv run, we first checked for potential migrations and migrated whatever was outdated. After that, we created a Django superuser, whose credentials were defined in the environment file previously described, and started the backend server on the container’s port 8000.
3. Dockerfile
Create the file ~/mayflower/api/Dockerfile and define the instructions to assemble the Docker image of the backend container.
   FROM python:3.10-alpine

   ENV PYTHONUNBUFFERED 1

   RUN apk update \
       && apk add postgresql-dev gcc python3-dev musl-dev
   RUN pip install --upgrade pip pipenv

   WORKDIR /api
   COPY ./Pipfile* ./
   RUN pipenv sync

   COPY . .

   COPY ./entrypoint.sh /entrypoint.sh
   RUN chmod o+x /entrypoint.sh

   ENTRYPOINT ["sh", "-c", "/entrypoint.sh"]
We started our Dockerfile by pulling a pre-built Python image. The Python Alpine image is based on Alpine Linux OS, is lightweight, and is just enough to serve our API.
The second command defined a value for the environment variable PYTHONUNBUFFERED, which avoids holding Python’s outputs into buffers. Doing this allows us to watch Python’s output in real-time when the container is running.
Then we updated the Alpine Linux packages and installed some extra packages. These packages are necessary to connect Django to PostgreSQL.
We also upgraded pip and installed pipenv. We use the packaging tool Pipenv to control the version of Python packages. Pipenv isolates our project into a virtual environment and guarantees that the version of the installed packages matches our requirements.
Pipenv keeps the desired version and the actual state of the required packages in the following files: Pipfile and Pipenv.lock. Therefore, we copied these files into the container and installed the listed packages running pipenv sync.
Next we’ve copied all the files from ~/mayflower/api (host machine) into /api (container). Separately, we had to copy ~/mayflower/entrypoint.sh (host machine) to the root folder of our container and add permissions to execute this file. That was necessary because in the next step, we will use a docker-compose file to bind ~/mayflower/api (host machine) to /api (container), and this action overwrites every file in /api (container), removing the permission to execute /api/entrypoint.sh (container).
Finally, we called entrypoint.sh, which will perform necessary migrations, create a Django superuser, and run the backend server.
4. docker-compose
Create the file ~/mayflower/docker-compose.yml and configure the service. The package docker-compose will help us to define, build, run, and stop the Docker containers from our application in a single configuration file.
   version: "3.8"

   services:
     django:
       container_name: api
       build:
         context: ./api
       env_file:
         - ./api/.env
       ports:
         - 8000:8000
       volumes:
         - ./api:/api
First, we defined which version of docker-compose we wanted to use. You should use the same version of docker-compose as I did to avoid mismatching results.
Then we listed instructions to build the service (django) and run the container (api).
In build:context we set that docker-compose should look for the Dockerfile in ~/mayflower/api. Note that docker-compose uses relative paths referred to the path of docker-compose.yml – in our case, the reference path is ~/mayflower.
We also defined the path of the environment file, which is also relative to the directory where the docker-compose file is located.
Since the container is serving the API on port 8000, we exposed port 8000 of the host machine to port 8000 of the container,
At the end of the configuration file, we bound ~/mayflower/api (host machine) to /api (container). This synchronizes host and container directories and allows changes in the host files to be instantaneously applied to the correspondent files in the container.
Now we can spin up our container with docker-compose up --detach, open our browser, and navigate to http://localhost:8000/admin to manage the database or http://localhost:8000/api/students to fetch all the data from the Student model.
API
If at some point you want to see the output of the API running in the container, you can just run `docker logs api` and check it out.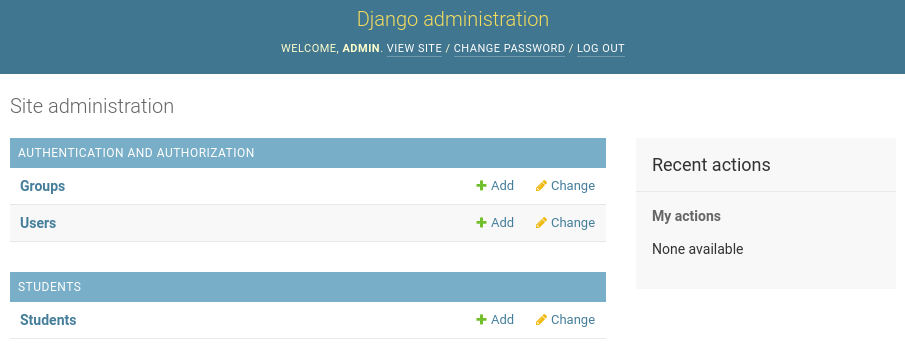
Django Admin 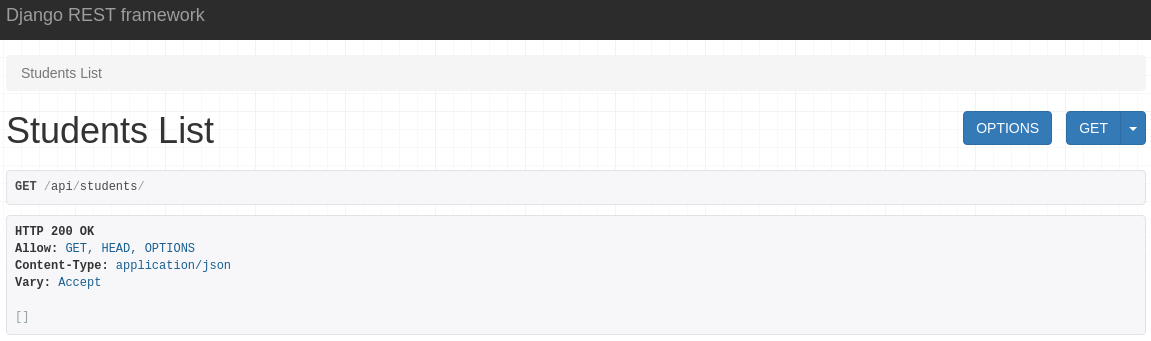
Student’s Endpoint
Stage 2: Database (PostgreSQL)
So far, so good. We already have a Docker container serving our API. But the backend is still using SQLite, which is natively supported by Django. Let us switch to PostgreSQL and serve the database from a separated Docker container.
Different from the backend container setup, in which we had to give the Dockerfile many instructions to customize a pre-built Python image, for the PostgreSQL container, we can set up the database simply by passing to the docker-compose file a pre-built PostgreSQL image with some environment variables. The PostgreSQL image provides an OS with all the required features to serve the database.
1. Credentials
Add the database credentials to ~/mayflower/api/.env.
   ...

   PSQL_NAME = 'postgres'
   PSQL_USER = 'admin'
   PSQL_PASSWORD = 'password'
   PSQL_HOST = 'psql'
   PSQL_PORT = '5432'
In this file, we declared three environment variables that refer to the name of the PostgreSQL database containing our data (PSQL_NAME) and to valid credentials for a PostgreSQL Admin user that can manage the database (PSQL_USER and PSQL_PASSWORD). The variables PSQL_HOST and PSQL_PORT indicate, respectively, the name of the service hosting the database and the port to be used. We chose the value 5432 because it’s the default port of PostgreSQL.
2. docker-compose
In the file ~/mayflower/docker-compose.yml, create a new service for the database.
   ...
   services:
     psql:
       container_name: db
       image: "postgres:14.1-alpine"
       environment:
         - POSTGRES_DB=postgres
         - POSTGRES_USER=admin
         - POSTGRES_PASSWORD=password

     django:
       ...
       depends_on:
         - psql
Initially, we set the service and the container names as psql and db, respectively.
Since we didn’t have to customize the Docker image, we passed the image name directly to docker-compose and avoided writing a Dockerfile. For the same reasons described in the backend setup, we picked a PostgreSQL image that uses the Alpine Linux OS.
Next, we defined three environment variables. These variables configure the PostgreSQL Admin’s user name (POSTGRES_USER) and password (POSTGRES_PASSWORD) for the specified database (POSTGRES_DB). Note that these variables must correspond to the variables PSQL_NAME, PSQL_USER, and PSQL_PASSWORD, declared in ~/mayflower/api/.env.
At the end of the file, we added a dependency on the psql service. The dependency assures that the django service will only start after the database is set up.
Attention!
Docker volumes are used to sync the data in the host machine with the data in the container. A nice feature of volumes is data persistence in case of undesired container failure. Since volumes persist the data across builds, they are the preferred mechanism for holding databases. For that reason, you may want to store your data in volumes in a production environment. Since we have not used a Docker volume in this tutorial, every time we restart our database container, we will lose all the data added to the database.3. Configuration
Configure ~/mayflower/api/api/settings.py so that Django has permissions to access and manage the database.
   ...
   from os import environ
   ...
   DATABASES = {
       'default': {
           'ENGINE': 'django.db.backends.postgresql',
           'NAME': environ.get('PSQL_NAME'),
           'USER': environ.get('PSQL_USER'),
           'PASSWORD': environ.get('PSQL_PASSWORD'),
           'HOST': environ.get('PSQL_HOST'),
           'PORT': environ.get('PSQL_PORT'),
       }
   }
   ...
We used the environ mapping object from os to import the environment variables from ~/mayflower/api/.env, and we linked their values to the Django variable DATABASES.
We can now rebuild our containers with docker-compose up --build --detach, open our browser, navigate to http://localhost:8000/admin, and use our Django super user credentials to log in to the Django Admin page. In Django Admin, we can add new students to the Student table and check that they are displayed at http://localhost:8000/api/students.
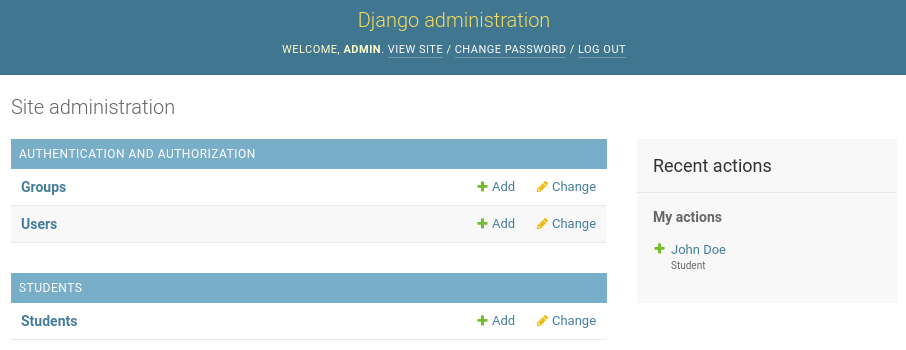
Django Admin with data 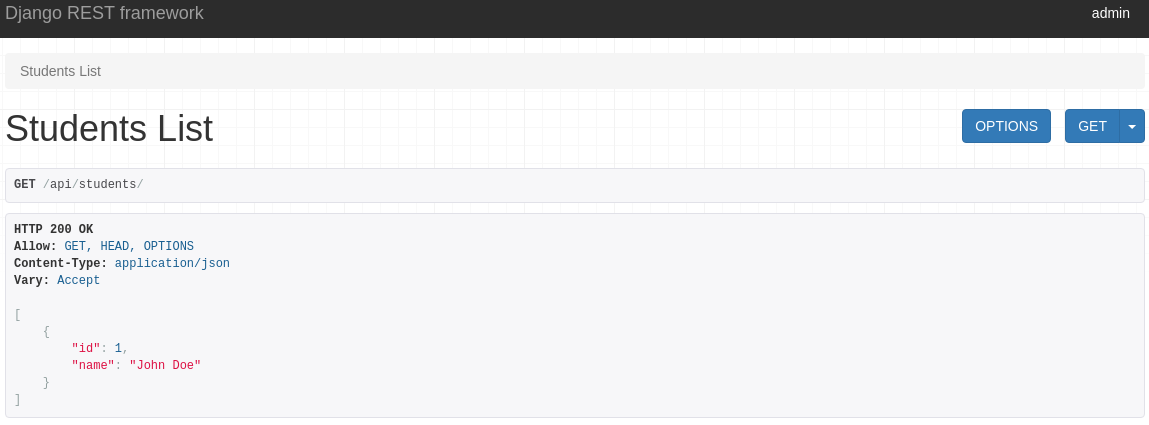
Student’s Endpoint with data
Stage 3: Frontend (React)
We have been doing a great job so far! The backend and the database are served in isolated environments and communicate with each other. To achieve the ultimate goal of this tutorial, we just need to encapsulate the React APP in a Docker container. To do so, we will need to create a new Dockerfile for the frontend and a new Docker service in our docker-compose file.
1. Dockerfile
Create ~/mayflower/app/Dockerfile with instructions to build the Docker image for the React APP.
   FROM node:17.3-alpine

   WORKDIR /app
   COPY package.json .
   RUN npm install

   COPY . .

   CMD ["npm", "start"]
As usual, we started our Dockerfile by loading a pre-built image. This time we used a lightweight NodeJS image that contains the tools we need to serve the React APP.
We then copied the file package.json from the host machine into the container and installed the packages listed in this file running the command npm install. We decided to use the packaging tool NPM because it is already installed in the pre-built NodeJS image.
Lastly, we copied all the files from ~/mayflower/app (host machine) into /app (container) and with npm start we started the server.
2. docker-compose
Add a new service to ~/mayflower/docker-compose.yml corresponding to the frontend container.
   ...
   services:
     ...
     react:
       container_name: app
       build:
         context: ./app
       ports:
         - 3000:3000
       volumes:
         - ./app/src:/app/src
We started the instructions for the react service by defining the container’s name (app).
We also pointed build:context to ~/mayflower/app, so Docker will look for the Dockerfile in this directory at the build stage.
After that, port 3000 of the host system was exposed to port 3000 of the container, which serves the React APP by default.
The last instruction of this service bound ~/mayflower/app/src (host machine) to /app/src (container). This time we bound only the src directory because the files we would edit during the application development are there. With this setup, any change to files in this directory of the host machine will be instantaneously applied to the respective files in the container.
Finally, we can spin up our containers with docker-compose up --detach, open our browser, and navigate to http://localhost:3000. There we will see the list of students. If you do not see a list of students, you probably have stopped your containers earlier and lost your data. So just add new students to the Student table and check that the frontend renders it.
Output of the frontend container
You can run `docker logs app` if you want to see the output of the frontend container.
Congratulations, you have made it through, and now every single service of your full-stack web application is served by Docker containers!
Conclusion
After going through this tutorial, you have Docker containers serving your PostgreSQL, Django, and React services. With simple commands, you can start (docker-compose up) and stop (docker-compose down) your containers. Now you can share this reproducible project with your teammates and focus on what really matters: the features of your web application!
It is important to note once more that this tutorial covered the setup of a development environment. If you want to put your application into a production environment, you will probably want to persist your data, implement CI/CD (Continuous Integration / Continuous Deployment), use a web server like Nginx to make your application more scalable, and apply other Docker best practices. However, that is a topic for another tutorial …
Now it is time to work on the features of your web application and tweak your containers to satisfy the new demands of your services. But do not rush, Docker can be complex, so take your time to absorb what you have learned here. Try to use Docker on your daily projects, and little by little you will feel more comfortable with it, and you will be ready for the next step.
Schreibe einen Kommentar